So if you do not know me you might not know that I want to adopt a Chinese baby girl and have since I was about 12 when I decided I also wanted to name her Lillie (not taken from Sex and the City). So I have a bit of an obsession with Chinese girls because they are so adorably cute! Someone showed me these pictures the other day of a dad who is a photographer who photographs his adorable two girls and I had to share them. Here is where you can see more on Flickr .
9.17.2011
9.11.2011
Teacup Keurig Coffee Holder
So I saw this idea on Pinterest and fell in love one because I love teacups, two because I love shabby chic, and third I love a recycling craft project. A Keurig coffee maker has been the latest addition to my kitchen and even though I do not drink coffee I thought this would be a cuter option than the wire coffee rack.
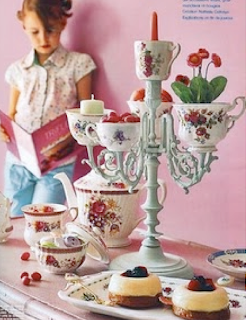
Here was my inspiration via Pinterest
Here was my inspiration via Pinterest
I went on a hunt for a candle holder like this and lucked out at a garage sale one morning I got 2 for $20!
I decided start by only making one & chose to paint it a light blue to match my teacups and the shabby chic color scheme
I then glued my teacups on with Gorilla Glue and let sit overnight
The top center is a milk/creamer cup, I decided to put sugar & creamer packets for the coffee there and put it beside the Keurig!
If you are not a member of Pinterest yet and want to be invited email me (kendylelaine1024@gmail.com) and I will send you an invite but don't blame me for being addicted!
8.21.2011
Cupcake Stand
There is a new website that I have become addicted to called Pinterest that has so many ideas for decorating, DIY crafts, quotes, fashion, baking, and much more. I saw this idea on there of how to make a cupcake or cake stand out of Dollar Tree items. I made two so the total project cost me about $4.
I purchased:
*2 martini glasses
*2 round cake pans
For the project you will also need:
* spray paint
*heavy duty glue (I used Gorilla Glue, can be bought at Walmart or Lowes)
*Sharpie or something to mark with
*2 heavy books
Step 1: Spray paint the 2 round cake pans, I just did the top and sides that would be seen
Step 2: Place one of the martini glasses in the center of the underside of the cake pan and mark four dots around it when you get it center...this will help when you are gluing to get it centered.
Step 3: Glue around the edge of the martini glass and place in the center of the cake pan, hold it steady and flip right side up. Place a heavy book on top to keep an air-tight seal and let it sit overnight
Step 4: Enjoy your DIY cupcake/cake stands!
8.20.2011
Samples, Samples, Samples
So I have already posted once about getting free samples but have since learned a few more tricks and sites that can deliver FREE samples to YOUR mailbox. Most samples take 4-6 weeks to arrive so once you become addicted you should receive something weekly.
On Facebook "LIKE" these pages :
*Hip2Save
*All You Magazine
*Suave
*Garnier USA
*Tide
*Bounce
*Dove
*Crest
*CoastalContacts.com (free glasses giveaways where you only have to pay shipping!)
Look-up and add any other product pages that you commonly use or like, more than likely they will promote samples or coupons.
I also was looking at anthropologie's website the other night and saw on the left hand side of the page is a tab that says "for the designer" I clicked on it hoping to get some design tips and......
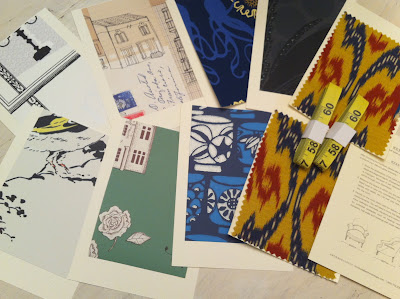
You can request FREE samples of their wallpaper and fabric!! I got my samples in two days and it also included two FREE measuring tapes.
On Facebook "LIKE" these pages :
*Hip2Save
*All You Magazine
*Suave
*Garnier USA
*Tide
*Bounce
*Dove
*Crest
*CoastalContacts.com (free glasses giveaways where you only have to pay shipping!)
Look-up and add any other product pages that you commonly use or like, more than likely they will promote samples or coupons.
 |
| This was a free $15 card that I got just for requesting a sample of Dove Shampoo! |
I also was looking at anthropologie's website the other night and saw on the left hand side of the page is a tab that says "for the designer" I clicked on it hoping to get some design tips and......
You can request FREE samples of their wallpaper and fabric!! I got my samples in two days and it also included two FREE measuring tapes.
And lastly a website called Sample Showcase has free samples linked to different websites and they randomly giveaway huge sample boxes full of goodies, so go join today!
Hope this has been helpful and GOOD LUCK....Sample away!
8.11.2011
U.S. Fabric Map
So I saw on Pinterest a map of the United States that was made from different fabric scraps, I pinned it and I could not wait to make it. So today that was ALL I did. This project required patience and a lot of cutting (remember from elementary school there are 50 states...and some of them are tiny!). So here is my venture of the U.S. Fabric Map...in the end I am in love with it!
Step 1:
I started with an old picture that we no longer use for the frame
Step 2:
I then printed off a U.S. map from Google, use the poster print option (2x2 sheets)
Step 3:
I then picked out 50 different fabric scraps from my collection and cut out each state, very carefully and matched them with a fabric. Then cut out the state in the chosen fabrics.
Step 4:
I then placed all the states on a white piece of fabric for the background to make sure all of them fit properly before gluing... Kentucky got lost but I finally got it back on the map! I used craft tacky glue.
Step 5:
Once every state was glued in place I spray painted my frame turquoise and TA-DA it was done...FINALLY!
You get a good geography lesson doing this I had forgotten where half of the states were! Now this is in my study where I can enjoy all the hard work of putting the United States together!
8.09.2011
Owls
All are unique and have different button eyes and they also all have vintage chenille on them!
If you are interested in one just let me know I only have these 5.
7.21.2011
Twilight
Today we went to Portland and insisted on going to the Cullen's which is near downtown.It was very modern in the midst of older colonial style homes. I was soo excited and cannot believe I was on the same grounds that Robert Pattinson aka Edward Cullen has walked on. They were doing some work as you can see from the bulldozer in the background...maybe they are adding on a room for Renesmee.
Here are some pictures!!
 |
| The balcony where Rosalie and Bella stood and talked |
 |
| Edward's room that I think is on the top floor of the house! |
7.03.2011
Cookies
I am always up for a challenge so to be honest when I found out an enemy of sorts had started making and decorating cookies....I had to challenge myself and see if I could do the same, for my first try I am pretty pleased but I enjoy cupcake and cake decorating much more and the making everything from scratch and mixing a ton of different colors can be annoying.
Here are the results...
 |
| The dough made from scratch is rolled out and then I cut the cookie shapes out. |
 |
| Stars cut out ready to be baked at 350 degrees for ~10 minutes |
 |
| Then you use the icing to outline what you will fill in with thinner icing, it's called "flooding" the cookie |
 |
| The cookie with the "flooding" icing added |
 |
| I decided to do a tie-dye effect on some...I added a blob of the color I wanted, here blue, in the center of the cookie |
 |
| Then take a toothpick and swirl around in different directions and ways for an array of designs..and no one will know if you messed up with this design! |
 |
| This is a Palm Tree I did..excuse the fingerprint from me moving the cookie |
 |
| The finished Stars..I also wrote July 4th on some of them! |
 |
| More designs all done with the toothpick! |
 |
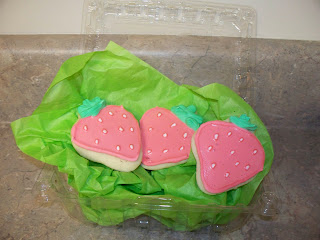
| Strawberries...they were my favorite! |
 |
| Pineapples that are pretty cute...and my favorite fruit in non-cookie form. |
Hope you enjoyed this I got most of my helpful information from this great blog...Bake at 350...but I will warn that it is time consuming!
Subscribe to:
Comments (Atom)


